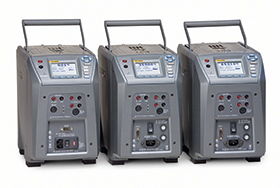

Fluke’s 914X Series field metrology wells (Fluke 9142, Fluke 9143, Fluke 9144) extend high performance to the industrial process environment by maximising portability, speed and functionality, with little compromise to metrology performance.
The units are packed with functionality and remarkably easy to use. They are lightweight, small, and quick to reach temperature setpoints, yet they are stable, uniform and accurate. These industrial temperature loop calibrators are ideal for performing transmitter loop calibrations, comparison calibrations or simple checks of thermocouple sensors.
With the ‘process’ option, there is no need to carry additional tools into the field. This optional built-in two-channel readout reads resistance, voltage and 4-20 mA current with 24 V loop power. It also has onboard automation and documentation. Combined, the three models cover a wide temperature range from -25°C to 660°C.
High performance for the industrial environment
Designed for the industrial process environment, these field metrology wells weigh less than 8,2 kg and have a small footprint, making them easy to transport. Optimised for speed, they cool to -25°C in 15 minutes and heat to 660°C in the same amount of time.
Field environment conditions are typically unstable, having wide temperature variations. Each field metrology well has built-in gradient-temperature compensation that adjusts control characteristics to ensure stable performance in unstable environments. All specifications are guaranteed over the environmental temperature range of 13°C to 33°C.
Built-in features to address large workloads and common applications
Whether you need to calibrate 4-20 mA transmitters or a simple thermostatic switch, a field metrology well is the right tool for the job. With three models covering the range of -25°C to 660°C, this product family calibrates a wide range of sensor types. The optional process version (models 914X-XP) provides a built-in two-channel thermometer readout that measures PRTs, RTDs, thermocouples, and 4-20 mA transmitters, which includes the 24 V loop supply to power the transmitter.
Each process version accepts an ITS-90 reference PRT. Readout accuracy ranges from ±0,01°C to ±0,07°C, depending on the measured temperature. Reference PRTs for field metrology wells contain individual calibration constants that reside in a memory chip located inside the sensor housing, so sensors may be used interchangeably. The second channel is user-selectable for two-, three- or four-wire RTDs, thermocouples or 4-20 mA transmitters. For comparison calibration, users don’t need to hassle with carrying multiple instruments into the field since these units do it all in a single instrument.
Traditionally, calibrations of temperature transmitters have been performed on the measurement electronics, while the sensor remained uncalibrated. Studies have shown, however, that typically 75% of the error in the transmitter system (transmitter electronics and temperature sensor) is in the sensing element. Thus, it becomes important to calibrate the whole loop – both electronics and sensors.
The process option of the Fluke 9142, Fluke 9143 and Fluke 9144 makes transmitter loop calibrations easy. The transmitter sensor is placed in the well with the reference PRT, and the transmitter electronics are connected to the front panel of the instrument. With 24 V loop power, you can power and measure the transmitter current while sourcing and measuring temperature in the well. This allows for the measurement of as-found and as-left data in one self-contained calibration tool.
All models allow for two types of automated thermostatic switch test procedures: auto or manual setup. Auto setup requires the entry of only the nominal switch temperature. With this entry, it will run a three-cycle calibration procedure and provide final results for the deadband temperature via the display. If you need to customise the ramp rate or run additional cycles, the manual setup allows you to program and run the procedure exactly how you would like. Both methods are fast and easy and make testing temperature switches simple.
Metrology performance for high-accuracy measurements
Unlike traditional dry wells, field metrology wells maximise speed and portability without compromising the six key metrology performance criteria laid out by the EA: accuracy, stability, axial (vertical) uniformity, radial (well-to-well) uniformity, loading and hysteresis. All criteria are important in ensuring accurate measurements in all calibration applications.
The instruments’ displays are calibrated with high-quality traceable and accredited PRTs. Each device (process and non-process versions) comes with an IEC-17025 NVLAP-accredited calibration certificate, which is backed by a robust uncertainty analysis that considers temperature gradients, loading effects and hysteresis. The 9142 and 9143 have a display accuracy of ±0,2°C over their full range, and the 9144 display accuracy ranges from ±0,35°C at 420°C to ±0,5°C at ±660°C. Each calibration is backed with a 4:1 test uncertainty ratio.
| Tel: | +27 10 595 1824 |
| Email: | [email protected] |
| www: | www.comtest.co.za |
| Articles: | More information and articles about Comtest |
© Technews Publishing (Pty) Ltd | All Rights Reserved