



Implementing a successful infrared programme at a plant involves planning and action. This article discusses the benefits and outlines the steps that will help to grow thermographic imaging into a key component of any modern maintenance strategy.
Getting started
Gain support from management: send management a summary of what you learned in thermography training and your ideas for what can happen next. Communicate what you would like in the way of support and find out how thermography performance results will be measured.
Integrate with other maintenance efforts:
thermography is often part of a larger preventive or predictive maintenance programme. Data from several technologies, such as vibration, motor circuit analysis, airborne ultrasound, and lube analysis can all be used to study the condition of a machine asset. Ideally, these technologies will work from and with the same computerised maintenance management system (CMMS), to access equipment lists and histories, as well as to store reports and manage work orders.
Establish written inspection procedures: written inspection procedures drive the quality of the data collected and ensure the inspection is done safely. Key ingredients include safety, conditions required, and guidance for interpreting the data.
As a starting point for creating your specific inspection procedures, review the industry standards that currently exist. See if your company has procedures that can be used as a guide and then start with the major electrical and mechanical applications and refine as you develop the programme.
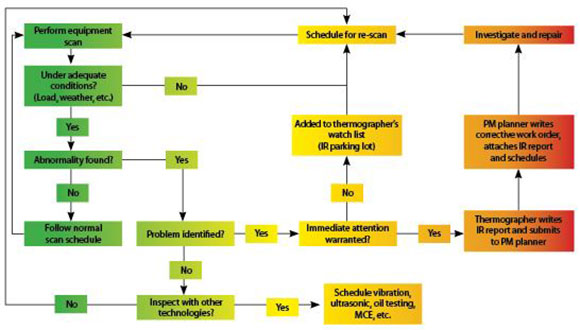
Avoid prioritising findings based on temperature alone. Temperature measurements identify problems extremely well and may help characterise problems, but they are not the best way to determine the cause of a failing component. Your inspection procedures should address the conditions required to locate problems, using thermography, as well as acknowledge the other technologies needed for further troubleshooting. Figure 1 shows how thermography fits into an overall maintenance programme.
Creating inspection routes
Begin by using existing lists of equipment from a CMMS or other inventory. Eliminate items that are not well suited for infrared measurement and focus on equipment that creates production bottlenecks. If possible, use history as a guide: where have failures occurred in the past? Use a database or spreadsheet to group the remaining equipment together, by or function, into roughly 2-3 hour inspection blocks.
If thermography is new in the plant, the first few inspection cycles may yield a large number of finds. Subsequent inspections should go more smoothly. After about three cycles, reorganise the routes so they are more efficient and add new routes and equipment into the inspection cycle as necessary. The optimum frequency of inspection will be determined by the needs of the assets. As they age, are heavily loaded, or are poorly maintained, inspections may become more frequent.
Frequency of inspection is based on a number of factors. The key drivers are safety, the criticality of the equipment, the expense of a failure, and the frequency with which problems impact production.
Conducting inspections
Working from a pre-inspection checklist is a good idea:
• Make sure the Fluke Thermal Imager is ready to go.
• Charge the batteries.
• Ensure that the system is within calibration by viewing a black body reference or conducting a simple ‘tear duct check’.
• Clear the memory of previously recorded data.
• If you will be following an inspection route that has been inspected previously, upload past results to the camera so they can be compared to new findings.
• If additional equipment is required, such as a digital clamp meter for load reading, or a voice recorder, etc., assemble all of it and make sure it is in good working order.
Unless you are conducting a first-time baseline inspection, only record thermal images when problems or ‘exceptions’ are located. Take time to look at the finding from several different angles and collect any other data that might be useful for analysis, including additional visual images of the component. Do not worry about actually measuring temperatures until after you have found a problem. At that point, if it is appropriate, the correct emissivity and reflected temperature correction (RTC) can be used.
For electrical enclosures, such as an MCC panel, open only as many panels as is safe. If enclosure doors are left open for too long, any problem hot spots may cool off. Once you have completed inspecting an enclosure, close the cover to ensure the safety of anyone in the area. If necessary, post signs or barricades around an area during the inspection.
When the inspection is complete, meet briefly with the area manager(s) and review your findings. Prepare them for what you will say in your report, let them know when the report will be coming, and discuss when your next inspection cycle will occur. Download any data you have collected after each route as soon as possible to reduce the risk of accidental erasure. Delete any unnecessary images and process the rest individually, fine-tuning temperature measurements and making any adjustments to temperature level and span settings. Enter any supplemental data into the report page, along with the visual image of the equipment inspected.
Reporting results
The software that comes with the Fluke thermal imaging camera supports simple but useful comparisons of asset condition over time. An alarm temperature can be loaded onto an image before it is uploaded into the camera. During the current inspection, both that alarm setting and the previous image can be used to determine the extent of any changes that might have occurred. The new thermal image and data document the new condition. This can all be included in a report generated back in the office. Matching thermal and visual images is very useful, and a second thermal image, either a comparison over time or a follow-up image, can also be included.
Clearly identify the equipment inspected as well as the conditions found. Use the area measurement tool showing the maximum, minimum and average temperatures for the area, rather than the spot measurement tool whenever possible. This will ensure that the true maximum temperature is being identified. It is also important to report the conditions found during the inspection with regard to equipment loading and environmental variables. Note both the emissivity and the reflected background temperature corrections used.
Once the infrared data is correlated with data from other technologies, the actual operating condition of all assets will be known and can be reported in an integrated form. Those assets that are in an alarm stage (red) or an unknown stage (yellow) can then be scheduled for either repair or further monitoring, or managed in some other way, such as reducing load to minimise the risk of failure. Assets in good condition (green) are ready and available to make your plant profitable. Every machine asset may not be green, but at least you will know where the problem areas are and can anticipate their condition in the larger picture of plant operations. Reports organised using the green/yellow/red indicators quickly show whether overall plant asset health is improving, a powerful communication to managers.
Analysis of data over the long term is vital, so plan on accumulating it in forms that facilitate this process. The benefit is twofold. First, you will see trends that may not be obvious in a day-to-day analysis. For instance, you may discover that the motor shop is doing a poor job, or that a certain brand of fused disconnect consistently has problems.
The second benefit is that you will see what is working (or not!) about your programme. You’ll see where problems are continuing to occur, enabling you to justify dedicating resources in those areas or decreasing the frequency of inspection because few problems are being found. It can also help target maintenance investments and allocation of maintenance funds to get the best returns.
I have my thermal imaging camera. Now what do I do?
In summary, now that you have your thermal imaging camera and have been trained to use it, here is what to do next:
1. Communicate thermography plans with managers and operators.
2. Integrate thermography into existing preventive or predictive maintenance programmes.
3. Review safety standards and procedures.
4. Create an equipment list, schedule and inspection routes.
5. Capture baseline images of all critical equipment during first survey.
6. Download images after each survey and convert data for tracking.
7. Create a report template and distribute results after each survey.
8. Set up alarms for image comparison and key indicator tracking over time.
9. Modify inspection conditions, lists and routes over time as necessary.
For more information contact Comtest, +27 10 595 1821, sales@comtest.co.za, www.comtest.co.za
| Tel: | +27 10 595 1824 |
| Email: | sales@comtest.co.za |
| www: | www.comtest.co.za |
| Articles: | More information and articles about Comtest |






© Technews Publishing (Pty) Ltd | All Rights Reserved
 printer friendly version