Thermography is a method of inspecting electrical and mechanical equipment by obtaining heat distribution pictures.
This inspection method is based on the fact that most components in a system
show an increase in temperature when malfunctioning. The increase in temperature in an electrical circuit could be due to loose connections or a worn bearing in the case of mechanical equipment. By observing the heat patterns in operational system components, faults can be located and their seriousness evaluated.
The inspection tool used by thermographers is the thermal imager. This is a sophisticated device that measures the natural emissions of infrared radiation from a heated object and produces a thermal picture. Modern thermal imagers are portable with easily operated controls. As physical contact with the system is not required, inspections can be made under full operational conditions resulting in no loss of production or downtime.
The Land Cyclops thermal imager is a device designed for plant condition monitoring, preventative maintenance and process monitoring applications. Potential applications include:
* Inspection of electrical equipment.
* Inspection of mechanical equipment.
* Inspection of refractory lined structures.
Measurement of temperature using infrared methods: basic physics
An object when heated radiates electromagnetic energy. The amount of energy is related to the object's temperature. The thermal imager can determine the temperature of the object without physical contact by measuring the emitted energy.
The energy from a heated object is radiated at different levels across the electromagnetic spectrum. In most industrial applications it is the energy radiated at infrared wavelengths that is used to determine the object's temperature. Figure 1 shows various forms of radiated energy in the electromagnetic spectrum including X-rays, ultraviolet, infrared and radio. They are all emitted in the form of a wave and travel at the speed of light. The only difference between them is their wavelength, which is related to their frequency.

The human eye responds to visible light in the range 400 to 750 nm. The vast majority of infrared temperature measurement is made in the range 200 nm to 20 micrometres (or microns). Although emissions are mostly unable to be detected by a standard camera, the thermal imager can focus this energy via an optical system onto a detector in a similar way to visible light. The detector converts infrared energy into an electrical voltage, which after amplification and complex signal processing, is used to build the thermal picture in the operator's viewfinder on board the thermal imager.
Energy distribution
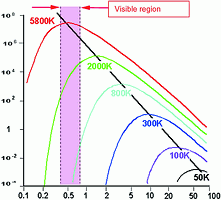
Figure 2 shows the energy emitted by a target at different temperatures. As can be seen the higher the target temperature the higher the peak energy level. The wavelength at which peak energy occurs becomes progressively shorter as temperature increases. At low temperatures the bulk of the energy is at long wavelengths.

Emissivity
The amount of energy radiated from an object is dependent on its temperature and its emissivity. An object which has the ability to radiate the maximum possible energy for its temperature is known as a black body. In practice there are no perfect emitters and all surfaces tend to radiate somewhat less energy than a black body.

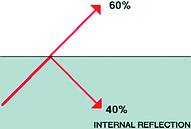
Figure 3 shows why objects are not perfect emitters of infrared energy. As energy moves towards the surface a certain amount is reflected back inside and never escapes by radiative means. From this example it can be seen that only 60% of the available energy is actually emitted. The emissivity of an object is the ratio of the energy radiated to that which the object would emit if it were a black body.

Hence emissivity is expressed as: -

Emissivity is therefore an expression of an object's ability to radiate infrared energy.
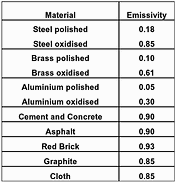
Emissivity tends to vary from one material to another. With metals a rough or oxidised surface usually has a higher emissivity than a polished surface - here are some examples:
It can be shown that there is a relationship between emissivity and reflectivity. For an opaque object this is Emissivity + Reflectivity = 1.0. Hence, a highly reflective material is a poor emitter of infrared energy and will therefore have a low emissivity value.
Effects of emissivity
If a material of high emissivity and one of low emissivity were placed side-by-side inside a furnace and heated to exactly the same temperature, the material with low emissivity would appear to the eye much duller. This is due to the different emissivities of the materials causing them to radiate at different levels, making the low emissivity material appear cooler than the high emissivity material, even though they are at exactly the same temperature.
The thermal imager would see this in the same way as the eye and produce an error in making the temperature measurement. The temperature of an object cannot be determined by simply measuring its emitted infrared energy, a knowledge of the object's emissivity must also be known.
Two ways that the emissivity of an object can be determined are as follows:
1. Consult manufacturers' literature (always ensure these have been evaluated at the operating wavelength of your thermal imager as emissivity can vary with wavelength).
2. Have the object's emissivity evaluated by a laboratory method.
There are two main ways to overcome the problem of emissivity:
1. Mathematically correct the temperature measurement value. This is usually carried out within the signal processor of the thermal imager. Most modern thermal imagers have a compensation setting that is easily set by the operator.
2. It may be possible to paint the surface of a low emissivity target with a high and constant emissivity coating. This tends to elevate the target to a much higher emissivity level, but this may not be possible on all process plants.
When carrying out thermographic inspections, faults are often identified by comparing heat patterns in similar components operating under similar loads. This is an alternative to very precisely predicting the emissivity of each individual component and obtaining absolute temperature values.
Thermal imagers measure the natural emissions of infrared radiation from a heated object and produce a thermal picture. Modern thermal imagers, such as the Land T1814, are usually very flexible containing many standard and optional features. Here are some of those of the T1814.
Optical
A motorised focus is used to obtain a clear image at different distances from the thermal imager. The focus distance is from 380 mm to infinity. An electronic zoom function enables 2X and 4X magnification of the image.
Image display
The realtime thermal image is displayed in colour on a 102 mm LCD screen. The image may be colourised by any one of the eight different palettes available. The realtime thermal image is also displayed on the built-in high-resolution colour viewfinder.
Digital memory
A built-in nonvolatile memory system enables the simple capture of a large number of thermal images. Thermal images are stored on a removable compact flash memory card. This on board facility enables stored image recall to the viewfinder and selective image deletion. Several seconds of digital voice clip may be stored with each image and replayed or re-recorded on board the imager. The sound file can be replayed in by the imager or with image processing software. A 256 MB card is capable of storing up to 1000 thermal images and up to an eight second digital voice clip with each image. Image file size including voice annotation is 256 kB. Transfer to image processing software for further image processing and report generation is via a USB Compact Flash memory card reader.
Temperature measurement
Temperature measurement at single point in the scene is possible.
Post processing
This facility enables the generation of further temperature analysis in the imager viewfinder on stored images. A single movable point enables spot measurement at any point in the scene and a movable cursor generates a temperature profile trace.
Image processing software
Frames of interest may be stored as an image file for record purposes, or be subjected to a range of processing functions as follows:
a) File handling: save, delete and directory facility.
b) Image colouring: the image may be colourised using any one of five colour palettes.
c) Temperature measurement: a variety of different modes are available to enable temperature measurement at any point in the scene, calculation of maximum, minimum or mean from within any defined area in the scene, profiles, histograms, and isotherms.
d) Parameter changes: parameters saved with the stored image may be changed within the software. These include emissivity, and background temperature.
e) Image enhancements: filtering, and zoom facility.
Some of the available temperature measurement modes include:
* Measuring the temperature at a number of points in the scene. These points are allocated numbers and a pop-up lists the temperatures at each of the numbered points.
* Measuring the average temperature within rectangular areas of the picture - these too are numbered and listed as the points were in the previous mode.
* Average temperature within polygon areas - again, producing a list of results.
* Graph of temperature along entered profile lines. This mode produces a set of temperature curves that correspond to the values to be found along user-defined lines across the image, producing one graph for each profile line.
* Temperature distribution within a selected area: This produces a statistical breakdown of the temperature distribution indicating 'how much area is at what temperature'.
* Isotherm bands can be adjusted to aid in highlighting which areas of the image are within specific user-defined temperature ranges.
The software system is menu driven making it easy to use.
Report writer
The image processing system provides a report writing facility. This may be used to provide a hard copy record of the thermal image accompanied by an imported photograph and any other information for reference purposes.
Thermal imagers in predictive maintenance applications
In today's industrial plants it is essential that unplanned breakdowns and the resultant costly loss of production are kept to a minimum. Predictive maintenance schemes have been introduced to identify potential problems and reduce downtime.
Thermography in maintenance applications is based on the fact that most components show an increase in temperature when malfunctioning and faults steadily get worse before failure.
Routine inspection programmes using thermal imagers can often offer the following benefits:
* Inspections can be made under full operational conditions and hence there is no loss of production.
* Equipment life can be extended.
* Plant downtime may be reduced.
* Plant reliability may be increased.
* Plant repairs scheduled for the most convenient time.
* Quality of repair work may be inspected.
Thermal imagers are mainly used for industrial predictive maintenance in the following areas:
* Electrical installations.
* Mechanical equipment.
* Refractory lined structures.
Inspecting electrical installations
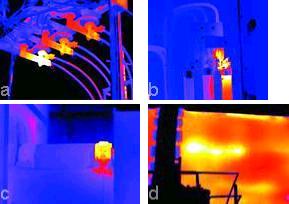
Faults in an electrical installation often appear as hot spots that can be detected by the thermal imager. Hot spots are often the result of increased resistance in a circuit, overloading, or insulation failure. Figure 4(a) shows a hot spot created by a bad connection in a power distribution system.

Some of the components commonly inspected
When looking at similar current carrying connectors, a poor connection shows a higher temperature due to its increased resistance. Hot spots can be generated as a result of loose, oxidised, or corroded connectors.
Figure 4(b) shows the fuses in the control panel of a machine. A faulty connection on the top of a fuse has created the hot spot that can easily be seen by the imager.
Three-phase motors require balanced phases and correct operating temperatures. It has been shown that if correct operating temperatures are exceeded the insulation life can be considerably shortened.
Other commonly inspected components include relays, insulators, capacitors and switches.
Inspection of mechanical equipment
Mechanical equipment inspected is often rotating machinery. Increased surface temperatures can be the result of internal faults. Excessive heat can be generated by friction in faulty bearings due to wear, misalignment or inadequate lubrication - Figure 4 (c). As with electrical installations it is desirable to perform the inspection with the system in operation wherever practically possible. Interpretation of results should be based on comparison between components operating in similar conditions under similar loads or by trend analysis. Equipment commonly inspected using thermal imagers would typically include bearings, gears, drive belts, couplings, shafts and pumps.
Inspection of refractory lined structures
The refractory structures of process plants can often have an increased lifetime if the degree of wear and erosion can be assessed. Thermal patterns produced by viewing the outer walls of a structure can indicate hot spots caused by worn refractories which my be corrected by appropriate maintenance.
Figure 4 (d) shows an abnormal heat pattern on the wall of a cement kiln, which has been caused by erosion of the refractory brick liner.
Equipment commonly inspected using thermal imagers would include electric arc furnaces, ladles, heat treatment furnaces, glass furnaces, rotary kilns and dryers. Land Instruments International is represented locally by Protea Automation Solutions.
For more information contact Jerry Smits, Protea Automation Solutions, 011 719 5700, [email protected], www.protea.co.za
| Tel: | +27 11 719 5700 |
| Email: | [email protected] |
| www: | www.protea.co.za |
| Articles: | More information and articles about Protea Automation Solutions |
© Technews Publishing (Pty) Ltd | All Rights Reserved